Becoming A Better Practitioner
The journey to becoming a great HVAC technician is a collection of small steps.
To be a better diagnostician, you need to master smaller skills first.
These may include taking temperature and pressure readings, calculating superheat and subcooling.
These are the foundations of being a good technician.
To be a better technician, you’ll need to have a deeper understanding of refrigeration and psychrometric measurements.
One of these is dew point.
Dew Point
Dew point is one of the most underrated readings a technician can take when diagnosing comfort problems.
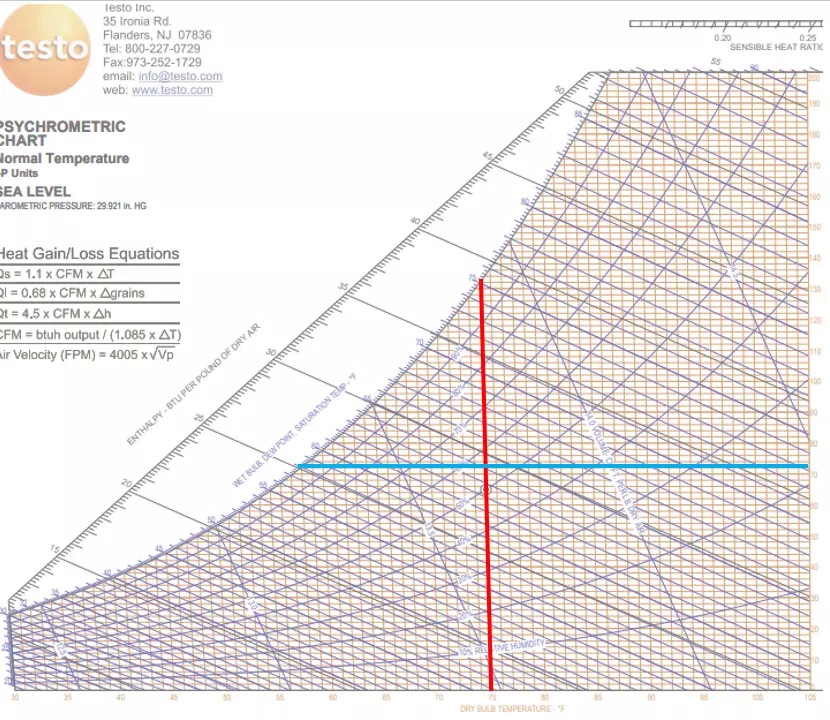
Most of us are familiar with the psychrometric chart, but most immediately get turned off by the lines going in every possible direction.
The dew point line simply goes from right to left on the chart.
When it intersects with the dry bulb line, which runs up and down, this forms a “cross hair”, like a rifle scope.
And in the crosshair lies the current condition of the air you are reading.
But What is Dew Point?
Simply, it is a measurement of the amount of water in the air.
What it’s actually telling us, though, is at what temperature the moisture will begin to fall out of the air in the form of condensation.
Think of air as a sponge, which can hold a maximum amount of an exact amount of water.
If you squeeze the sponge, it cannot hold as much, and the excess water will fall out.
At a given temperature, air can hold an exact amount of water before it is completely saturated.
If we begin to cool the air, it is like squeezing the sponge.
If we squeeze it hard enough, we make the sponge smaller and eventually, water falls out.
When we cool air, we make it “smaller,” and it eventually reaches saturation or its dew point, and condensation forms.
Years ago, it was difficult to measure dew point as a technician.
The most common method was to use a sling psychrometer, in which you give your dry bulb and wet bulb, then you had to plot dew point on the psychrometric chart.
It was nearly impossible to take these readings inside a duct.
But now, handheld electronic hygrometers (also called psychrometers) are available, affordable, and portable.
They even work with Bluetooth and sync up to powerful apps like Measurequick.
Taking an outdoor dew point measurement or knowing what the ASHRAE outdoor design dew point is will help you make good recommendations and design decisions.
Outdoor Dew Point
Let’s first understand what outdoor dew point tells us.
The higher this number is, the more moisture is in the air.
Humid climates like the Southern U.S. have extended periods of high dew point over 63°F (17.°C).
It’s not uncommon for coastal regions to experience periods of extremely high dew points of 80° (27°C)!
Knowing what your outdoor dew point is can help you understand why condensation forms inside a duct, a wall, or another place where moisture droplets shouldn’t form.
In fact, the ONLY place we want to see condensation form is on an evaporator coil.
Anywhere else is undesirable.
Let’s say that your customer is noticing mildew in their home during humid weather.
Biological growth forms as a result of condensation.
You know that the outdoor dew point sometimes gets above 70°F (21°C), and humid air travels right through porous materials like wood and insulation.
If your customer likes to set the thermostat below 70°, when the humid air hits a wall surface below its dew point temperature, condensation will form, leading to this growth.
This can happen inside a wall where it can go unnoticed for a long time.
Is the answer a dehumidifier?
A dehumidifier will help but only treats the symptoms, not the cause, by drying the inside of the building.
The problem is high dew point air from outside is getting inside.
The house needs to be air sealed.
If it never had an effective water vapor barrier, such as house wrap, installed, this could be a major project.
As an HVAC technician, this is probably outside your scope of services.
But understanding outdoor dew point will help you diagnose the problem correctly and point your customer in the right direction.
It will also arm you with a scientific reason why your customer should not set their thermostat so low because it invites condensation to form.
Indoor Dew Point
Just like outdoor dew point that is above 63°F (17°C) is considered high, the same applies to indoor dew point.
In fact, a few years ago, ASHRAE revised its Standard 55 Thermal Environmental Conditions for Human Comfort, which now states that indoor dew point should not be higher than 62.2°F (16.7°C) to prevent mold.
Prior to that, it only used relative humidity as a metric.
In Measurequick, you can change the Company Wide Settings “Air Moisture Indicators” from the default Wet bulb to the dew point.
I suggest making this change if you have the authority to do so.
What can inside and return air dew point tell you?
It will tell you how humid it is in the house.
If you are on a service call where the system is not running, you’ll probably find a high inside dew point, especially on a humid day with rain.
Once the system is repaired, indoor dew point should return to normal.
But if you are on a maintenance, or a comfort consultation, taking an inside dew point measurement can identify a humidity problem that the occupant may not even be aware of.
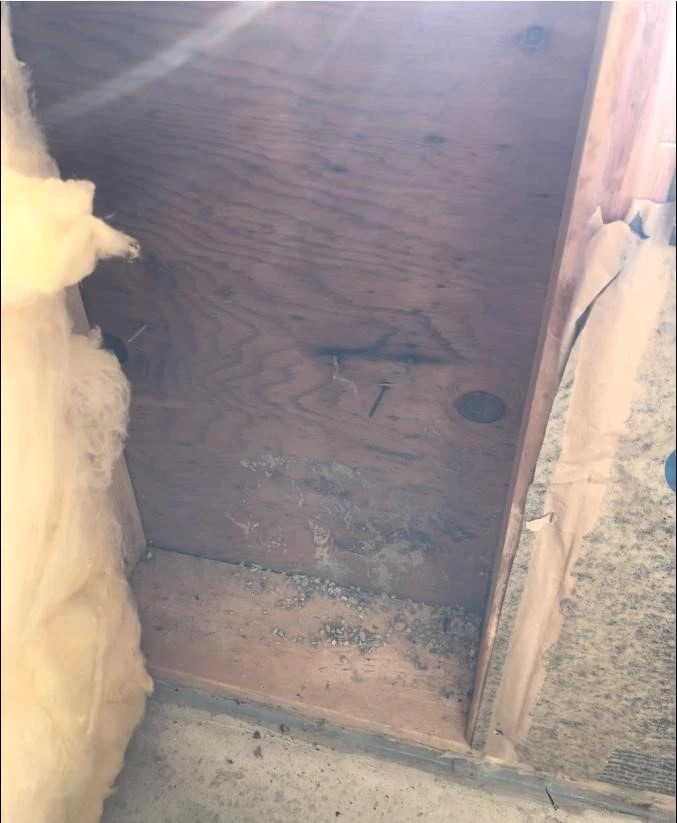
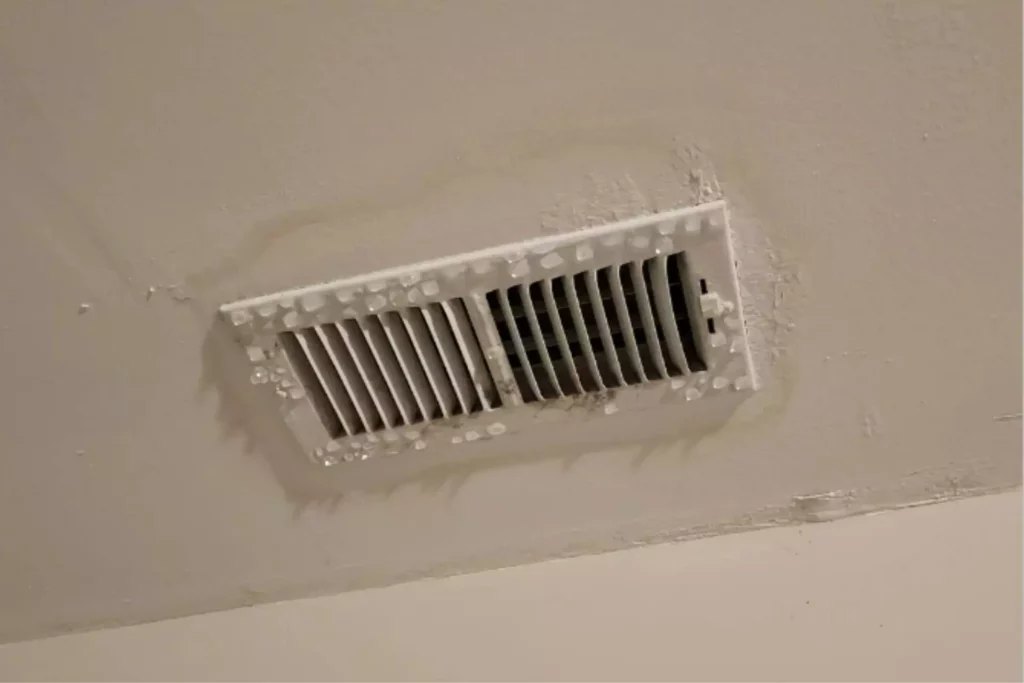
It will explain why there is condensation forming on the supply and even why mildew and biological growth are forming on surfaces around plumbing, duct, and electrical penetrations that are not sealed.
For the remainder of this article, I will go over various scenarios when checking dew point in 3 places:
- Return Grille.
- Return plenum
- Supply Plenum.
Return Plenum Dew Point
The return grille dew point and return plenum dew point are not always the same.
And when they are drastically different, this is a huge red flag.
In many places, the ducts run through unconditioned spaces like crawlspaces and attics, which generally have higher dew points.
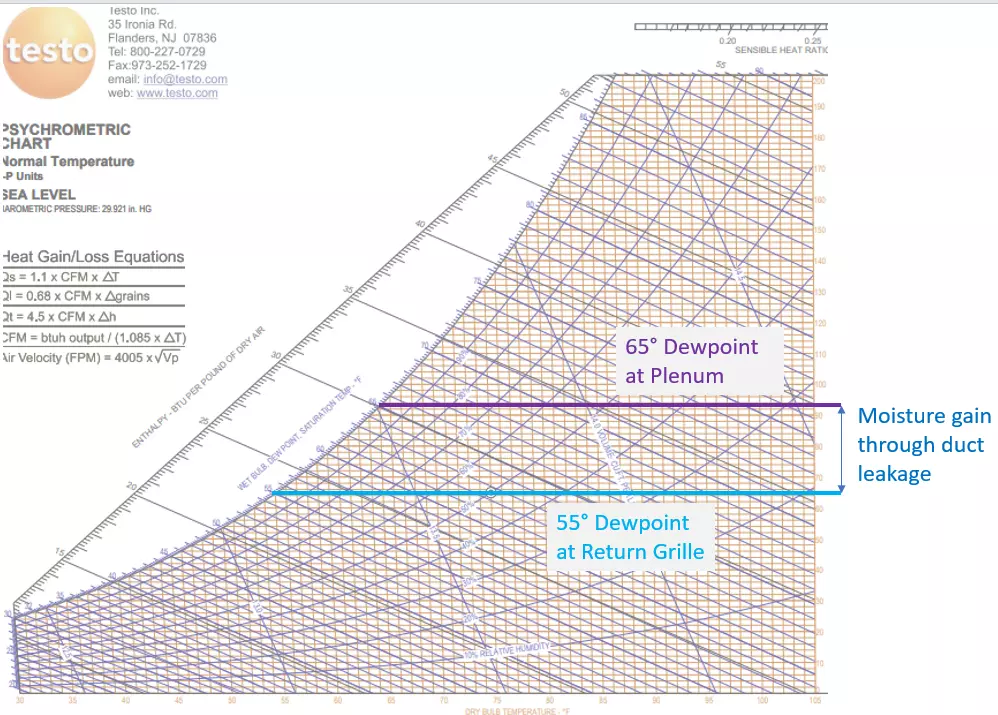
Taking an initial indoor dew point reading at a return grille, you make find a normal dew point of 55°F (13°C).
Let’s say the return ducts run through an unconditioned attic to an air handler also in the attic.
If you take a second dew point reading inside the return plenum at the air handler, you may find a much higher dew point, perhaps 65°F (18°C).
That tells you that the return duct is picking up moisture!
Remember that dew point is an indicator of the actual moisture content in the air.
How would a return duct pick up moisture? Through duct leakage!
You may say: “I could’ve come to the same conclusion by measuring temperature instead of dew point.”
But if the ducts run through a very hot attic, the air is likely to pick up heat conducting through the walls of the duct, even if they are insulated, thus not proving there is leakage.
Conversely, if the duct ran through a cool but humid crawlspace, you probably wouldn’t read a temperature rise (you might even read a temperature drop), but you definitely would see a dew point difference.
Remember, if fresh air is being introduced into the return plenum you would read a dew point difference at the return plenum.
Understand that duct leakage is a huge source of indoor humidity problems.
Supply Plenum Dew Point
I don’t often use the word “minutia,” but when I do, I often talk about things like supply air dew point.
As warm air passes across the cold evaporator coil, the air molecules come into contact with the coil fins, and the moisture that the air contains starts falling out.
Theoretically, the air is “saturated” because it is cooled below its dew point.
When Dry Bulb and dew point temperatures are both the same the air is saturated.
In reality, not all the air comes into direct contact with the coil.
Some of the air molecules pass through or around the coil unaffected.
This is called “coil bypass”.
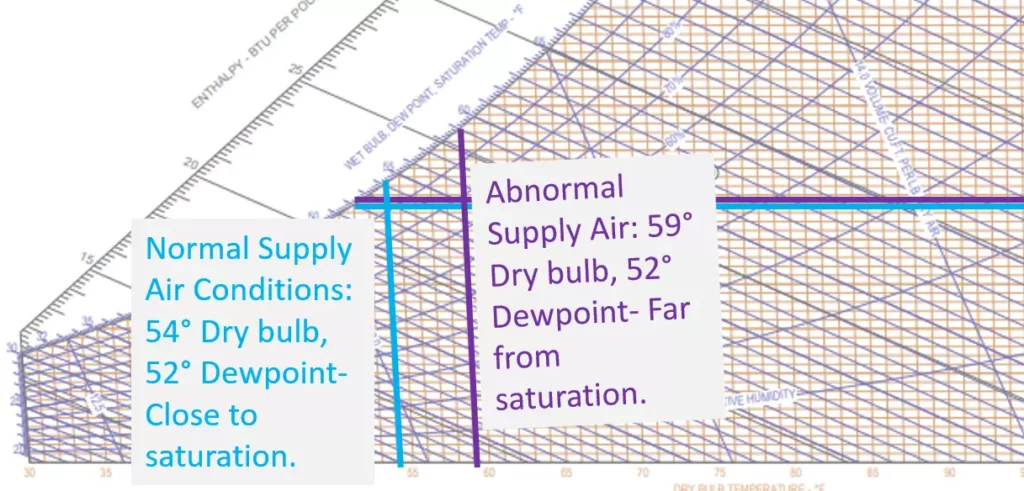
When that unaffected dry air then mixes back with the saturated air, the actual Dry Bulb might be 3-5° warmer than the dew point.
The air is close to saturation but not quite saturated.
Let’s take an example with an air source heat pump in cooling mode.
Reference the picture below.
If Supply Dry Bulb is 54°F (12°C) and the Supply dew point is 52°F (11°C) this tells us that the evaporator is cold and there is very little coil bypass.
The air is close to saturation which is what we want.
What if Supply is 59°F (14°C) but the supply air dew point is 52°F (11°C)?
What would cause such a large separation between Dry Bulb and dew point?
There may be a heat strip bank stuck on, reheating the air.
Or there may be air bypassing the evaporator coil, mixing saturated air with unconditioned air.
This can happen if the blower speed is set too high.
Sometimes the Supply air Dry bulb and dew point both read high while still being within a few degrees of each other.
For example, Dry Bulb may be 58°F (14°C), and dew point is 56°F (13°C).
This usually indicates a high load on the evaporator, where coil temperature is higher than normal but leaving air is still close to saturation.
The TXV is reacting to the high load. But measuring the dew point can alert a technician that there is a performance problem.
How To Get Started
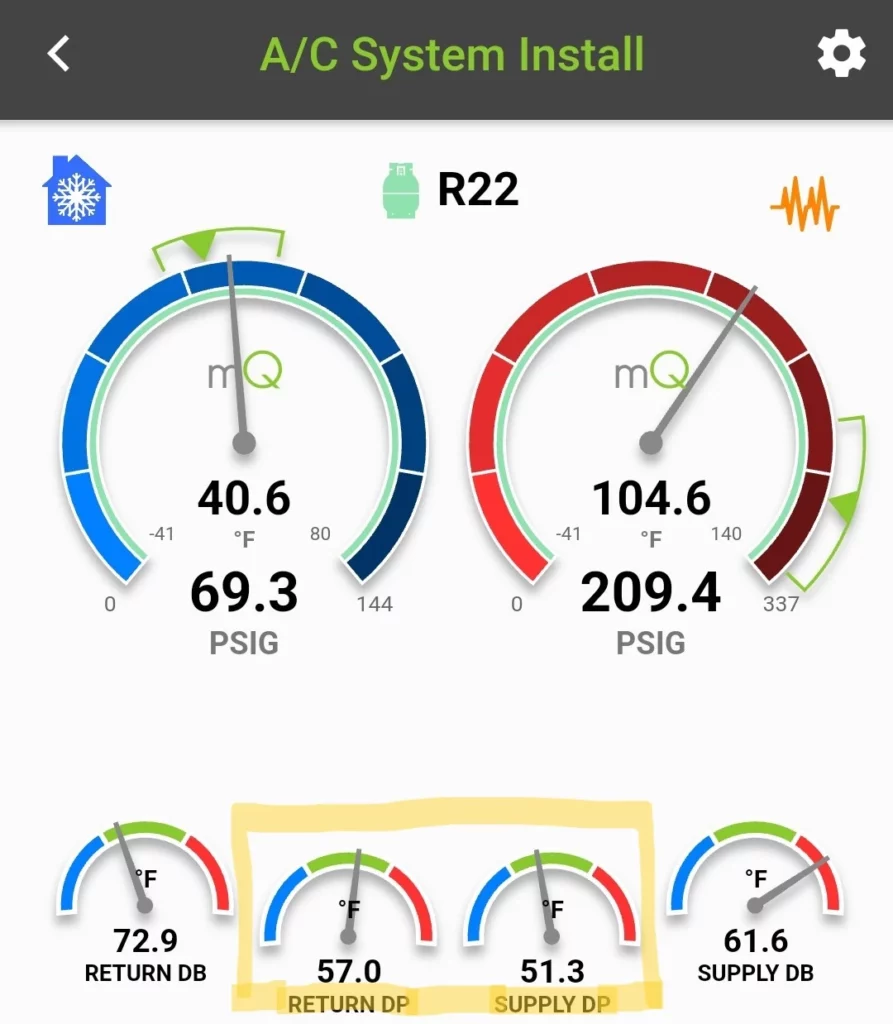
The easiest way to get started is to get a pair of Bluetooth hygrometers that connect to Measurequick. Testo and Fieldpiece make some great products.
Find a system cooling that is cooling properly and start a Non- Invasive test.
Then, note the temperature and dew point at the return grille, return plenum, and supply plenum.
Think it through and be able to explain to yourself why you see these differences.
Soon, you’ll get to the point where by taking the 3 dew point measurements alone, you’ll be able to quickly understand how the system is performing.
Conclusion
Checking systems using dew point is quick and easy once mastered.
It is non-invasive and does not require the use of gauges or even pipe temperature clamps.
But it is not a substitute for proper commissioning and benchmarking system performance.
Think of it as a quick performance screening.
If you see something abnormal, investigate further.
Understanding dewpoint is a key step to becoming a better technician.
Be sure to use it and become the best practitioner you can be.


