Key Takeaways
- Regular Inspection: Check hose seals before each use for compression or damage to prevent leaks during testing and evacuation
- Proper Tools: Use specialized tools like the Yellow Jacket Gasket Remover for safe, efficient seal replacement
- Assembly Lubricant: Apply Nylog Blue during installation to maintain seal flexibility and prevent premature failure
- Avoid Over-tightening: The number one cause of seal failure is excessive torque when connecting hoses
The Hidden Cost of Neglected Hose Seals
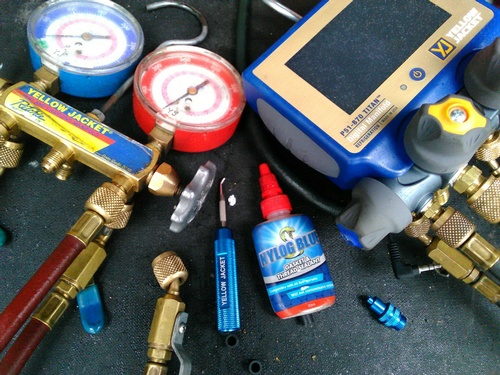
To some HVAC technicians, replacing hose seals or gaskets is actually a foreign concept. Yet this simple oversight can lead to frustrating callbacks, inaccurate readings, and wasted refrigerant. Hose maintenance is an integral part of successful day-to-day service and installation. When hose seals become compressed or broken, several problems arise: Leaks during testing or evacuation, Restriction to flow, Contamination risks from damaged seals allowing moisture and air infiltration, and Wasted time chasing phantom leaks.
When to Replace Your Hose Seals
The frequency of replacements really depends on use and abuse of your hoses. Heavy-use technicians might need monthly replacements, while lighter users can go quarterly. The key is developing a consistent inspection routine. Inspect seals before usage – if they appear compressed or flattened (no longer creating proper seal), cracked or split (allowing bypass around the seal), hardened or brittle (lost their elasticity), or missing chunks (obvious physical damage), then it’s definitely time to replace them. It’s far cheaper to replace a $0.50 seal than to lose refrigerant or compromise a refrigeration system evacuation procedure.
The Right Tools for the Job
The Yellow Jacket Gasket Remover Tool is designed specifically for this task. It’s actually three tools in one: a precision pick for removing old seals, a Schrader core tool for valve service, and a storage compartment for spare seals. Using Nylog Blue during assembly helps keep the seal and hose connection lubricated, preventing the seal from binding during installation and extending its service life.
Proper Installation Technique
The most important rule: don’t over-tighten your hoses. This is the number one cause of seal failures. The connection should be snug but not forced. If you’re using tools to tighten hose connections, you’re likely overdoing it. The step-by-step process includes: Remove the old seal completely using the pick tool, Clean the sealing surface of any debris, Apply a thin layer of Nylog Blue to the new seal, Insert the seal squarely into the fitting, Hand-tighten the connection until you feel resistance, Give an additional 1/4 turn maximum with your hand.
Building Professional Habits
Maintaining hoses should be second nature. Consider keeping a small maintenance kit in your truck with spare seals for different hose sizes, Nylog Blue or similar assembly lubricant, gasket removal tool, and clean rags for surface preparation. Hose seal maintenance might seem trivial, but it’s these small details that separate professional technicians from the rest.


