When working on small, self contained reach in coolers and freezers, you’ll notice many of them are not equipped with service access valves for testing, evacuation and recovery. This makes it difficult to troubleshoot if there is ever an issue with the system, but it also helps prevent leaks as there are less potential leak points.
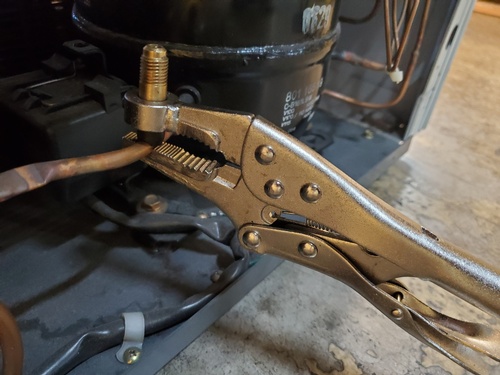
If you come across an appliance that is not cooling effectively and you suspect a leak, a restriction or a refrigerant related issue, you will need to add access fittings. Yellow Jacket makes an incredible tool that will gain you temporary access to the system. It’s a set of pliers, the tip of the pliers have a piercing needle and rubber seat, on the other side of the needle and seat is a 1/4″ service valve. Simply set the pinch depth and grip the pliers onto the system piping. You can use one for the high side and one for the low side if you desire. Once you have determined the issue, you will need to recover the refrigerant to install permanent access valves.

Here’s a tip, because these types of systems contain only a few ounces of refrigerant, hauling around a recovery machine is not always necessary. A simple evacuated recovery tank should be able to remove the charge. Set up a vacuum rated hose to your empty tank and attach the other end to a vacuum pump (using a manifold gauge is not necessary). Run your pump and pull your tank into a deep vacuum, you can use a micron gauge positioned on the tank to ensure a deep vacuum has been achieved.
When the tank has achieved a deep vacuum, attach your charging hose to the system via the temporary access valve (pliers) and attach the other side of your hose to the tank. Open the tank, the pressure difference between the evacuated tank and pressurized system should be enough to recover the entire charge in most cases.

At this point, you will need to install permanent access valves to the system for future reference, testing, recovery and evacuation.